Remember that Pinterest obsession I told you about? Well, this has led me to read LOTS and LOTS of elementary teacher blogs! I am simply fascinated by the creativity and organization those teachers have! I've learned more about bulletin boards, anchor charts, brain breaks, centers, and stations than I ever knew was possible! Then, I stumbled upon this blog: 4th Grade Frolics and her Monday Made It blog party... wow - can you say MIND BLOWN! So I shared it on Twitter and @pamjwilson said "Let's do it!!!"
How does it work???
It's pretty simple... every Monday I'll post (and hope you will too!) a classroom creation. This could be a lesson idea, a "for the classroom" decor/organization tool, or really anything you want to make that is for your classroom! Don't forget to take pictures and then create a blog post. After you've created your blog post, tweet the link with the hashtag #Made4Math or link your blog post in the comments here. If your creation is inspired by something you saw online (ahem, Pinterest in my case), then don't forget to give a shout-out to the original author as well :)
When does it start???
Ummm, Monday of course!!! I've already picked out a couple of items I want to make that are Pinterest inspired, I just needed the motivation to "Git'r'done". If Monday's not good for you, then try later in the week and tweet #Made4Math and link it here too.
What's the point???
Well.... see.... I have this little problem called "procrastination". That means that I find ideas and think "OMG - I totally want to do that!!!" but then I never do.... the idea behind this is to give me some accountability to actually follow through with some of the ideas I have. So, see, it's really all about me :)
Well... What are you waiting for???
Let's get started!!! Get ye to the nearest Hobby Lobby or Office Depot or in my case, my office closet where so many crafts get stored, and start creating!!! I can't wait to see what you dream up!!!! :)
P.S.
@pamjwilson did a MUCH better job explaining it... read her post HERE
Saturday, June 30, 2012
Tuesday, June 26, 2012
Bulletin Boards - Part 1
In case you don't read @approx_normal's blog, one of her posts last week was about secondary classroom decor. One of her frustrations was how difficult it had been to find pictures and examples of how to set up a classroom. In addition to her blog post, I had been scouring pinterest for classroom ideas - which lead to serious "I want to be an elementary teacher" envy! I mean, seriously, when I look at the elementary teacher blogs and their organization and their creativity, it makes me just want to go buy a Cricut machine and color coordinate my world! But, before I rushed out and purchased tons of cool stuff from Hobby Lobby, my practical side kicked in and I decided instead to redo my bulletin boards :)
Some background...
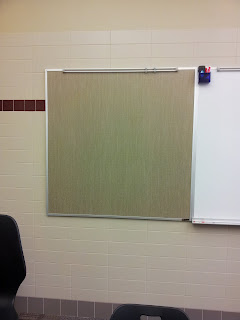
Last summer, I moved into a new building which meant a lot of packing (and unpacking) and 3 new bulletin boards to decorate. For some reason, my school doesn't do the traditional cork bulletin boards, we have these bizarre gray things:
In my previous classroom, I had this cute blue fabric with ladybugs and daisies, which I really liked, but I decided I needed something more classy and mature for the new building. So off to the fabric store(s) I went... it took me hours to find the perfect fabric! I love chocolate brown and blue together and I loved this fabric. Of course, that fabric then led to hours and hours of searching for the right color of border... who knew how difficult it was to match blues!?!?!
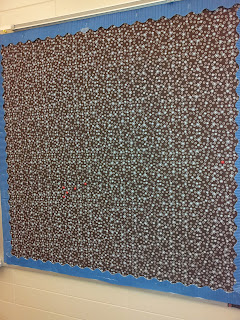
So I lived with my beautiful brown and blue fabric for a year and while I really did love the pattern, I also had some ideas of how to use my bulletin boards this year and I did NOT want to go through the whole color-match issue again! I mean, seriously, the ONLY border I could find was the old-school bordette stuff! So, back to the fabric store(s)... but this time I was smarter and shopped online first! I found the perfect fabric at Hobby Lobby and it was 30% off! Woot!!! I mean, just check out this color combo....
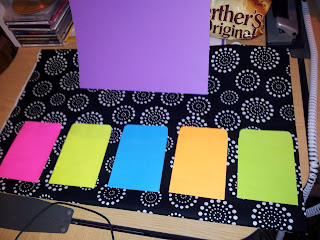
LOVE IT!!! The black and white background with neon accents.... beautiful!! Of course, that meant I HAD to go to school to try it out!
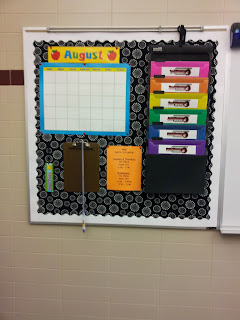
Isn't it ppuuuuurrrrddddyyyy? :) I just LOVE it! The hanging file on the right is where I put make up work. Each hour is color coded and that color also is the color for their turn in basket and their files/folders. Whenever a student is absent, they know to check that folder for any handouts. The clipboard is where I place the sign out sheets for the hall pass so I can have a record of who leaves my room. Obviously if they are going to a different building or the nurse's office, then I write a traditional pass, but this hall pass is for the little trips like to fill up their water bottle, etc. At first I wasn't sure about the white trim, but it's really growing on me. I mean, check out the view from my desk:
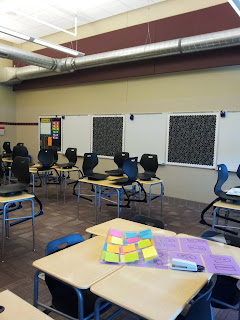
You'll notice that the two other boards aren't done yet and you'll also notice the mess of colors on the student desks in front of my desk. That's part of what is going on the other two boards. One of them will be for AP Stat and the other for Algebra 2. After cruising the font websites the other night, I found the perfect bulletin board font, so I installed the font, ran my titles off onto purple cardstock, laminated and cut it out. Let's just hope and pray that no student asks me what font I used! (See the link above for the font name if you're unsure why that's a problem)
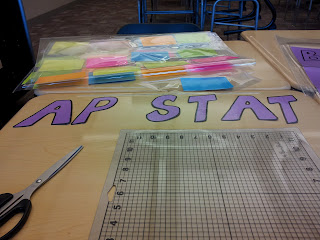
Tomorrow I hope to finish up the Algebra 2 board by adapting Mathy McMatherson's Wall of Remediation. I purchased neon library card pockets to post on the boards to put my Learning Target cards in. Since I laminated the card pockets, I can write on the pocket with the current Learning Targets and cycle out the old and put in the new LTs. I'm not sure what to do yet with the AP Stat board, but I'll figure it out soon enough :)
Some background...
Last summer, I moved into a new building which meant a lot of packing (and unpacking) and 3 new bulletin boards to decorate. For some reason, my school doesn't do the traditional cork bulletin boards, we have these bizarre gray things:

In my previous classroom, I had this cute blue fabric with ladybugs and daisies, which I really liked, but I decided I needed something more classy and mature for the new building. So off to the fabric store(s) I went... it took me hours to find the perfect fabric! I love chocolate brown and blue together and I loved this fabric. Of course, that fabric then led to hours and hours of searching for the right color of border... who knew how difficult it was to match blues!?!?!

So I lived with my beautiful brown and blue fabric for a year and while I really did love the pattern, I also had some ideas of how to use my bulletin boards this year and I did NOT want to go through the whole color-match issue again! I mean, seriously, the ONLY border I could find was the old-school bordette stuff! So, back to the fabric store(s)... but this time I was smarter and shopped online first! I found the perfect fabric at Hobby Lobby and it was 30% off! Woot!!! I mean, just check out this color combo....

LOVE IT!!! The black and white background with neon accents.... beautiful!! Of course, that meant I HAD to go to school to try it out!

Isn't it ppuuuuurrrrddddyyyy? :) I just LOVE it! The hanging file on the right is where I put make up work. Each hour is color coded and that color also is the color for their turn in basket and their files/folders. Whenever a student is absent, they know to check that folder for any handouts. The clipboard is where I place the sign out sheets for the hall pass so I can have a record of who leaves my room. Obviously if they are going to a different building or the nurse's office, then I write a traditional pass, but this hall pass is for the little trips like to fill up their water bottle, etc. At first I wasn't sure about the white trim, but it's really growing on me. I mean, check out the view from my desk:

You'll notice that the two other boards aren't done yet and you'll also notice the mess of colors on the student desks in front of my desk. That's part of what is going on the other two boards. One of them will be for AP Stat and the other for Algebra 2. After cruising the font websites the other night, I found the perfect bulletin board font, so I installed the font, ran my titles off onto purple cardstock, laminated and cut it out. Let's just hope and pray that no student asks me what font I used! (See the link above for the font name if you're unsure why that's a problem)

Tomorrow I hope to finish up the Algebra 2 board by adapting Mathy McMatherson's Wall of Remediation. I purchased neon library card pockets to post on the boards to put my Learning Target cards in. Since I laminated the card pockets, I can write on the pocket with the current Learning Targets and cycle out the old and put in the new LTs. I'm not sure what to do yet with the AP Stat board, but I'll figure it out soon enough :)
Thursday, June 21, 2012
Cornell Notes in Math Class
A few weeks ago, @lmhenry9 sent out a tweet asking about Cornell Notes in math class. This morning, @aanthonya sent out another request. Since Cornell Notes are a staple in the AVID classroom, I thought I would post a "how to" on using Cornell Notes in a math classroom.
Rationale
If you do a google search on Cornell Notes, you will find pages and pages about the history of Cornell notes, why you should use them, what the benefit is, etc. However, what is harder to find is the down and dirty, how do I do this, what's so special about C-Notes, etc. Honestly, when I first heard of them at the start of my AVID journey, they scared me. I remember sitting in my first AVID summer insitute stressed because I had NO CLUE what they were talking about! Unfortunately, I felt that stress for quite a while because it took time for me to understand that C-Notes weren't as scary or weird as they seemed. They are really just the same notes I had taken for ages in a slightly different format.
Setting up the Page
If you've heard of C-Notes, you've probably realized that there's some formatting that needs to be done. There are C-Note generators online or you might create your own C-Note blackline master (see the one we use in our AVID classes here). However, both of those require you to run off copies, which may not be feasible, depending on your allowed copy count. :)
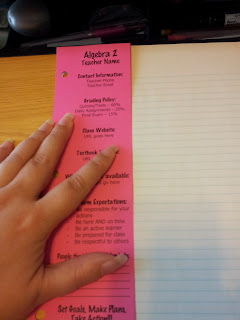
Enter in the Cornell Notes Bookmark. This is an idea that I got at the AVID training several years ago and I instantly loved the idea because I could have put contact info, important formulas, etc on this bookmark and kids could also use it to draw a straight line down their notebook paper to create their 2-column format. Of course, cutting out 100 of these bookmarks isn't the most fun way to spend the week before school starts in August, so I definitely suggest finding a great TV show to help keep your mind occupied :)
So, now that all the bookmarks are printed on cardstock, cut out and 3-hole punched, kids are ready to start making their notes. Lay the bookmark on top of your notebook paper and use the edge as a guide to create your left/right columns:
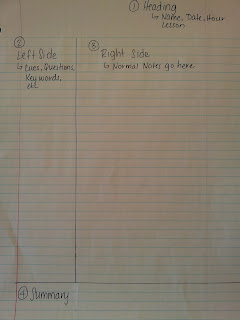
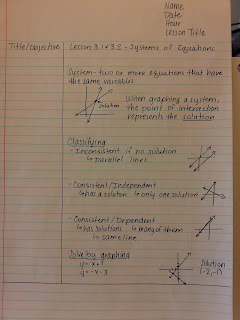
C-Notes have 4 main parts. The heading, which is where the name/date/hour/topic information goes, the left and right sides, and the summary area. Some of the newer versions of C-Notes also have an area for the Essential Question (inspired by UbD). Here's the general layout of the page:
Let's take some notes!!
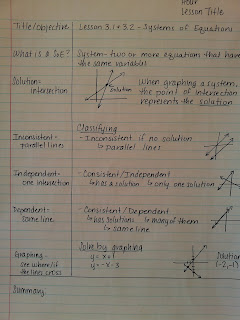
So now that the format of our notes is all done, it's time to take some notes. You'll notice above that the right side of the page is a bit wider. This is the area for the bulk of the notes. The right side is the same type of notes that you've always taken - the fast and furious scribbling of all of the information that you could get down at once. (This is obviously not a student paper - I did it this morning to show you an example)
Right side filled in:
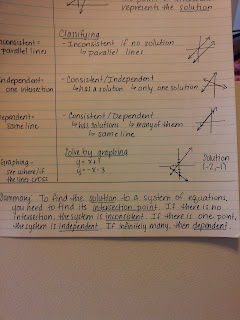
You'll notice that the above picture really looks like a traditional page of notes. The beauty of Cornell really is in the left side. After the notes are taken in class, students are supposed to review the notes within 24 hours and fill in the left side. They are supposed to read over what they wrote on the right side and put short reminders and cues to themselves. You'll see below where I went back and reviewed my notes to fill in the left side.
Left side filled in:
Now if you noticed above, I said "students are supposed to" twice... that means, in my experience this rarely happens :) Typically what happens in my experience is that they fill in the left side as they go with topic changes, subtitles, etc. The beauty of the left side, whether done at the same time or 24 hours later, is that the kids don't need to read ALL of the right side scribbles in order to get the gist of the lesson. They can scan through the left side cue words to refresh their memory or to find something quickly. (This has been a brillant addition to my note-taking during PD as well :) Love being able to quickly scan the left side!)
The final part of the C-Notes is the part my students hate the most. :) The summary section is admittedly the toughest part for students and teachers to do. Again, students are supposed to revisit their notes 24 hours later or so (comes back to that whole "forgetting curve") and write a brief summary of the notes. My students complaint was a valid one... they summarized what the teacher said/wrote on the right side. Then they summarized that again to write their cue/questions on the left side, now they were expected to summarize again at the bottom and they were just summarized out! But kicking and screaming, I recognize that being able to summarize was an essential skill for academic success. To combat some of this, I would sometimes let them do a "tweet" (limiting their response to 140 characters) or a "6 word memoir" of the lesson, which really shows off how much you can say in just a few words.
Summary filled in:
I've taken notes... now what??
I've already shared above my love of the left side. But there are other benefits to C-Notes as well. You can use the left side to predict test questions that the teacher might ask or commonly, use the C-Note format as a study guide. For many of my students, they would work their test review in C-Note format, with the problem on the left side and the work/solution on the right side. Then fold their paper on the line and you have an instant "flashcard" like study system.
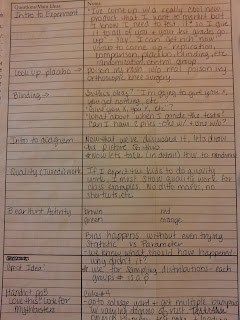
Now in case you are thinking - well, that's all fine and good, but I'll never use something like that!, let me leave you with a real-life page of notes that I took at a workshop. You'll notice that I'm just as bad as my kids in the summary section, but look at the benefit of that left side! MUCH easier to scan down the left side to see what I want than to read all that stuff on the right side! :)
Good luck on your C-Note journey!
Rationale
If you do a google search on Cornell Notes, you will find pages and pages about the history of Cornell notes, why you should use them, what the benefit is, etc. However, what is harder to find is the down and dirty, how do I do this, what's so special about C-Notes, etc. Honestly, when I first heard of them at the start of my AVID journey, they scared me. I remember sitting in my first AVID summer insitute stressed because I had NO CLUE what they were talking about! Unfortunately, I felt that stress for quite a while because it took time for me to understand that C-Notes weren't as scary or weird as they seemed. They are really just the same notes I had taken for ages in a slightly different format.
Setting up the Page
If you've heard of C-Notes, you've probably realized that there's some formatting that needs to be done. There are C-Note generators online or you might create your own C-Note blackline master (see the one we use in our AVID classes here). However, both of those require you to run off copies, which may not be feasible, depending on your allowed copy count. :)
Enter in the Cornell Notes Bookmark. This is an idea that I got at the AVID training several years ago and I instantly loved the idea because I could have put contact info, important formulas, etc on this bookmark and kids could also use it to draw a straight line down their notebook paper to create their 2-column format. Of course, cutting out 100 of these bookmarks isn't the most fun way to spend the week before school starts in August, so I definitely suggest finding a great TV show to help keep your mind occupied :)
So, now that all the bookmarks are printed on cardstock, cut out and 3-hole punched, kids are ready to start making their notes. Lay the bookmark on top of your notebook paper and use the edge as a guide to create your left/right columns:

C-Notes have 4 main parts. The heading, which is where the name/date/hour/topic information goes, the left and right sides, and the summary area. Some of the newer versions of C-Notes also have an area for the Essential Question (inspired by UbD). Here's the general layout of the page:

Let's take some notes!!
So now that the format of our notes is all done, it's time to take some notes. You'll notice above that the right side of the page is a bit wider. This is the area for the bulk of the notes. The right side is the same type of notes that you've always taken - the fast and furious scribbling of all of the information that you could get down at once. (This is obviously not a student paper - I did it this morning to show you an example)
Right side filled in:

You'll notice that the above picture really looks like a traditional page of notes. The beauty of Cornell really is in the left side. After the notes are taken in class, students are supposed to review the notes within 24 hours and fill in the left side. They are supposed to read over what they wrote on the right side and put short reminders and cues to themselves. You'll see below where I went back and reviewed my notes to fill in the left side.
Left side filled in:

Now if you noticed above, I said "students are supposed to" twice... that means, in my experience this rarely happens :) Typically what happens in my experience is that they fill in the left side as they go with topic changes, subtitles, etc. The beauty of the left side, whether done at the same time or 24 hours later, is that the kids don't need to read ALL of the right side scribbles in order to get the gist of the lesson. They can scan through the left side cue words to refresh their memory or to find something quickly. (This has been a brillant addition to my note-taking during PD as well :) Love being able to quickly scan the left side!)
The final part of the C-Notes is the part my students hate the most. :) The summary section is admittedly the toughest part for students and teachers to do. Again, students are supposed to revisit their notes 24 hours later or so (comes back to that whole "forgetting curve") and write a brief summary of the notes. My students complaint was a valid one... they summarized what the teacher said/wrote on the right side. Then they summarized that again to write their cue/questions on the left side, now they were expected to summarize again at the bottom and they were just summarized out! But kicking and screaming, I recognize that being able to summarize was an essential skill for academic success. To combat some of this, I would sometimes let them do a "tweet" (limiting their response to 140 characters) or a "6 word memoir" of the lesson, which really shows off how much you can say in just a few words.
Summary filled in:

I've taken notes... now what??
I've already shared above my love of the left side. But there are other benefits to C-Notes as well. You can use the left side to predict test questions that the teacher might ask or commonly, use the C-Note format as a study guide. For many of my students, they would work their test review in C-Note format, with the problem on the left side and the work/solution on the right side. Then fold their paper on the line and you have an instant "flashcard" like study system.
Now in case you are thinking - well, that's all fine and good, but I'll never use something like that!, let me leave you with a real-life page of notes that I took at a workshop. You'll notice that I'm just as bad as my kids in the summary section, but look at the benefit of that left side! MUCH easier to scan down the left side to see what I want than to read all that stuff on the right side! :)

Good luck on your C-Note journey!
Monday, June 18, 2012
Pinterest - My new obsession
I've been browsing pinterest for a while, totally impressed with the yummy recipes, the awesome home ideas, the very cool wedding/baby annoucements, and the creativity of the DIY/Crafts group. In the education section, I've been jealous of all the cool and fun stuff that the elementary teachers pinned, but it wasn't until yesterday that I said to myself, "Self, you should totally try using pinterest to catalog the great HS math ideas out there!" And so I did... and I'm hooked!
Visual bookmarks
In case you are one of the few that don't know what I'm talking about, pinterest is a visual bookmarking system that lets you pin a picture link to a bulletin board. Think of it as the 21st century answer to the "wedding scrapbook" - you know, when you were planning your wedding and you would cut out all the pictures of the things you liked and make them into a book? You didn't do that??? That's okay, I didn't either... But I was always envious of those people with mad scrapbooking skills to organize their memories :)
Anyway, back to pinterest... As you are browing the web (in my case today, blog posts that I had starred or google images), if there is a photo/graphic that you want to remember, you can pin it to a board. For a visual person like me, I can look back at my "Algebra" board and think "Oh yeah! Love that teaching idea!" without having to go read the entire post. Of course, if you click on the picture, you can go read the post if you need some more prompting...
My Algebra board so far...
I have boards for the courses I teach, foldables, classroom organization, general teaching ideas, etc.
The downside
One downside I have found is that a lot of blog posts (especially older ones) have great ideas but don't have pictures included. I am going to try to do a better job of documenting my posts with pictures to make it easier for people to pin :)
Try it out! It's so easy and very addictive :)
Visual bookmarks
In case you are one of the few that don't know what I'm talking about, pinterest is a visual bookmarking system that lets you pin a picture link to a bulletin board. Think of it as the 21st century answer to the "wedding scrapbook" - you know, when you were planning your wedding and you would cut out all the pictures of the things you liked and make them into a book? You didn't do that??? That's okay, I didn't either... But I was always envious of those people with mad scrapbooking skills to organize their memories :)
Anyway, back to pinterest... As you are browing the web (in my case today, blog posts that I had starred or google images), if there is a photo/graphic that you want to remember, you can pin it to a board. For a visual person like me, I can look back at my "Algebra" board and think "Oh yeah! Love that teaching idea!" without having to go read the entire post. Of course, if you click on the picture, you can go read the post if you need some more prompting...
My Algebra board so far...

I have boards for the courses I teach, foldables, classroom organization, general teaching ideas, etc.
The downside
One downside I have found is that a lot of blog posts (especially older ones) have great ideas but don't have pictures included. I am going to try to do a better job of documenting my posts with pictures to make it easier for people to pin :)
Try it out! It's so easy and very addictive :)
Wednesday, June 6, 2012
Algebra 2 Interactive Notebook
One of the MANY reasons I'm looking forward to Twitter Math Camp this summer is the opportunity to learn about Interactive Notebooks from @mgolding. However, I just cannot wait until then, so I've been talking to a lady at my school that uses them in her science class (she learned about them at AVID last summer), and today I decided to try it out.
The Rationale
The idea behind the INB is to help students organize and process the course content. Typically on the right side pages, students take traditional notes or tape/glue in handouts, quizzes, etc. On the left side, the students interact with the right-hand content by summarizing, journaling, making a graphic organizer, foldables, whatever. I have definitely seen a decline in student organization, so I'm willing to give it a try :)
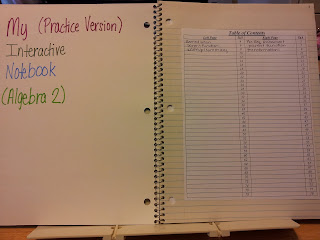
The Notebook
Most people like to use composition notebooks, but I don't have any of those lying around, but I do have TONS of the 10 cent spirals that I buy every year - (Confession time... I'm a school supply hoarder and junkie. If I'm ever on the TV show hoarders it will be due to either books or school supplies!)
On the inside cover and first page, like any book, is the author info page and the table of contents. This table of contents came from the web, but I think I would want one that also includes the date because not all students will have things on the same page due to differences in writing size. I also learned that I will need to put borders on anything I expect to be cut out because the unevenness really annoys me :) I am worried about the time to cut/tape everything though.... Suggestions?
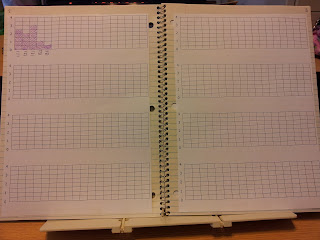
The next few pages typically have things like the syllabus, grading rubric, etc. I don't know what all will go here, but I do know one thing I want to put in there is an SBG score sheet for students to record their scores. This is just one I played with to see how it would look :)
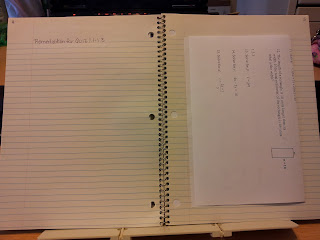
At our school, we start the year in Alg2 with a quiz over some very basic Algebra 1 skills. This quiz has 5 objectives - order of operations, solving equations, etc. So I put that on the next page and their remediation for that quiz would go on the left. Notice that I taped in the quiz sideways, so it could still be opened and looked at :) I don't know how well tape will hold up over time, but it's worth a shot.
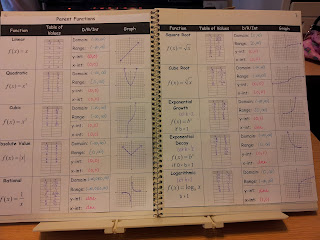
The next few pages are where I really had to stretch a bit (and I already found a math error, but I'm too lazy to correct it, so forgive me). Last summer, the Alg2 teachers got together and redesigned the first weeks of Alg2 in order to do the necessary Algebra 1 review in the context of Algebra 2. While I was in on the planning, my schedule got changed the week before school started, so I was not in on the implementation. That means that all I had to go on while building my practice notebook was some very rough notes from last summer. I know they started with an introduction to parent functions so that they could review table of values, graphing points, intercepts, and the concepts of domain and range. I don't have the parent function sheet they used, so this is one I created today. Again, forgive math errors - I was doing this in a hurry :)
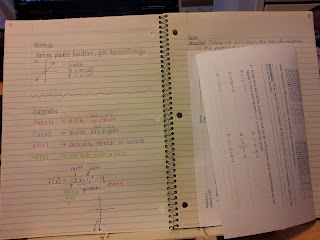
In the pacing guide I had, there were a few more days, but I need more detail from my Alg2 buddies, so I skipped ahead. On the right side, you can see the Objective (which I need to start posting daily) and the handout. On the left, you can see the daily warmup (totally made up on the spot) and the summary of the lesson. This will need to be more fleshed out over the course of the summer, but it gives you the general idea.
Conclusions and Questions
I have to say that one thing I'm really looking forward to here is the use of color. I love pens of different colors (remember that hoarder part?), but I know some kids will resist. :(
I don't know what to do in the notebook (especially on the right hand side) on the days where we do an activity (card sort, etc). What pitfalls and such might I run up against trying to do this? I know that one thing is for certain - while I am a pretty organized person, I'm going to have to be even more organized in order to know what I want on the right/left side each day and that part frankly scares me. :( However, a quick glance on the web shows how popular these are, so there has to be redeeming value, right? :) And seriously... we get to play with scissors, tape, and COLORS! :) Yay!
The Rationale
The idea behind the INB is to help students organize and process the course content. Typically on the right side pages, students take traditional notes or tape/glue in handouts, quizzes, etc. On the left side, the students interact with the right-hand content by summarizing, journaling, making a graphic organizer, foldables, whatever. I have definitely seen a decline in student organization, so I'm willing to give it a try :)
The Notebook
Most people like to use composition notebooks, but I don't have any of those lying around, but I do have TONS of the 10 cent spirals that I buy every year - (Confession time... I'm a school supply hoarder and junkie. If I'm ever on the TV show hoarders it will be due to either books or school supplies!)
On the inside cover and first page, like any book, is the author info page and the table of contents. This table of contents came from the web, but I think I would want one that also includes the date because not all students will have things on the same page due to differences in writing size. I also learned that I will need to put borders on anything I expect to be cut out because the unevenness really annoys me :) I am worried about the time to cut/tape everything though.... Suggestions?

The next few pages typically have things like the syllabus, grading rubric, etc. I don't know what all will go here, but I do know one thing I want to put in there is an SBG score sheet for students to record their scores. This is just one I played with to see how it would look :)

At our school, we start the year in Alg2 with a quiz over some very basic Algebra 1 skills. This quiz has 5 objectives - order of operations, solving equations, etc. So I put that on the next page and their remediation for that quiz would go on the left. Notice that I taped in the quiz sideways, so it could still be opened and looked at :) I don't know how well tape will hold up over time, but it's worth a shot.

The next few pages are where I really had to stretch a bit (and I already found a math error, but I'm too lazy to correct it, so forgive me). Last summer, the Alg2 teachers got together and redesigned the first weeks of Alg2 in order to do the necessary Algebra 1 review in the context of Algebra 2. While I was in on the planning, my schedule got changed the week before school started, so I was not in on the implementation. That means that all I had to go on while building my practice notebook was some very rough notes from last summer. I know they started with an introduction to parent functions so that they could review table of values, graphing points, intercepts, and the concepts of domain and range. I don't have the parent function sheet they used, so this is one I created today. Again, forgive math errors - I was doing this in a hurry :)

In the pacing guide I had, there were a few more days, but I need more detail from my Alg2 buddies, so I skipped ahead. On the right side, you can see the Objective (which I need to start posting daily) and the handout. On the left, you can see the daily warmup (totally made up on the spot) and the summary of the lesson. This will need to be more fleshed out over the course of the summer, but it gives you the general idea.

Conclusions and Questions
I have to say that one thing I'm really looking forward to here is the use of color. I love pens of different colors (remember that hoarder part?), but I know some kids will resist. :(
I don't know what to do in the notebook (especially on the right hand side) on the days where we do an activity (card sort, etc). What pitfalls and such might I run up against trying to do this? I know that one thing is for certain - while I am a pretty organized person, I'm going to have to be even more organized in order to know what I want on the right/left side each day and that part frankly scares me. :( However, a quick glance on the web shows how popular these are, so there has to be redeeming value, right? :) And seriously... we get to play with scissors, tape, and COLORS! :) Yay!
SBG and Motivation
As always, @lmhenry9 has given me a lot to think about in her latest blog post. This year's implementation of SBG was definitely different than the previous year. During 2010-11, I only did SBG in Algebra 2 and (for the most part) I had kids that were very happy to be in control of their success. Many of them had not had success in previous math classes and the idea that they controlled their destiny (aka grade) was a selling point in many of their minds. Granted, it was my first year with SBG, so I may be remembering some of it with rose colored glasses, but this year I really noticed some diffferences.
The core question comes down to this.... How do you reach/encourage the reluctant learner?
First, let me take a large part of the blame... I had very large classes (at the end of the year, I had 122 students in 4 AP Stat classes) and by the end of the day I was just flat out exhausted, so I did not do as much as I could/should have to reach those learners. Also, most of those reluctant students were in my 5th and 6th hour classes, which were my most challenging classes in academics, behavior, and teacher-patience level.
But, all of that aside, I did have several students (especially in those two classes) that I reached out to multiple times, trying to encourage them to come in, get help, and reassess objectives to no avail. For some of them, I begged them to come in, provided a multitude of resources, made myself more than available (before school, after school, advisory, during any "off" hours), wrote them notes on their quizzes, emailed with their parents, etc and still nothing. Sadly, I cannot say that I individually spoke to every student and those I did speak to, I didn't speak to often enough, but I am at a loss at what to do. These were seniors in high school - about to embark on a college/career journey and eventually I had to let them make their own choices.
How can I do a better job next year of reaching out to those students and letting them experience success?
*Sigh*
Subscribe to:
Posts (Atom)